Join the AI-Based Image Generation Revolution With Stable Diffusion
These algorithms are able to generate stunning artwork just from typing a text description of the image you’d like to generate, including knowledge of which specific art style to use. For example you can request such algorithms to generate an astronaut riding on a horse on the moon in styles like a 60’s photograph or a Picasso painting.
One main drawback to DALL-E 2 was that it was hidden behind an API, initially only being available on invite-only basis. While that has changed now and anyone may subscribe to the service, there is a monetization scheme behind it that only allows a few free images to be generated before it requires you to buy additional credits. Furthermore it is not possible to download the model’s weights to further experiment with it.
Today, just 6 months after the release of DALL-E 2 we are now witnessing the introduction of Stable Diffusion, a similar algorithm but this time released to the public including its original code and model weights, allowing it to be run on your own hardware. As the model is relatively lightweight it will run on any GPU with at least 10 GB of VRAM, so a relatively accessible RTX 3060 12GB will already allow you to try this yourself!
For more details from the official site from the team behind Stable Diffusion check https://stability.ai/blog/stable-diffusion-public-release
This blog post is split up in two parts:
- In the first part I will show how to work with the original code base from GitHub including a way to batch-generate images.
- In the second part I will present a web-based GUI which allows you to better experiment with generating artwork and looking into the results
Part 1 - Working with the original GitHub source
The team behind Stable Diffusion released their source together with the model weights. I recommend you to look at the following GitHub first: https://github.com/CompVis/stable-diffusion
The model and its weights are located in the following Huggingface repository: https://huggingface.co/CompVis/stable-diffusion
At this moment the latest version of the model weights is 1.4. To download the Stable Diffusion 1.4 weights use the following link: https://huggingface.co/CompVis/stable-diffusion-v-1-4-original/resolve/main/sd-v1-4.ckpt. You may need to register with Huggingface to accept the model’s license. The model file is a few gigabytes in size so may take a few moments to download.
For starters clone the GitHub repo in a working directory:
git clone https://github.com/CompVis/stable-diffusion
Now cd into stable-diffusion and create a folder for the model checkpoint:
mkdir -f models/ldm/stable-diffusion-v1
Now copy the sd-v1-4.ckpt file into models/ldm/stable-diffusion-v1 and rename it to model.ckpt.
I am using Anaconda for managing Python and its packages. All dependencies are listed in the bundled environment.yaml which is an Anaconda-specific descriptor for the required packages. To create a new environment specific to this project use the following command:
conda env create -f environment.yaml -n compvis-stablediffusion
This will create an environment named compvis-stablediffusion which you can rename to your own liking.
Remember to activate the new environment:
conda activate compvis-stablediffusion
Image generation and prompt engineering
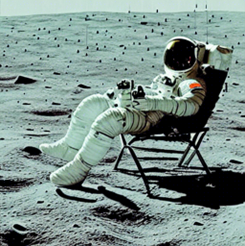
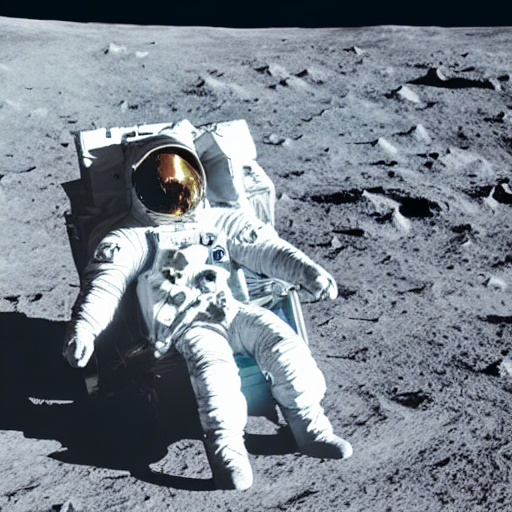
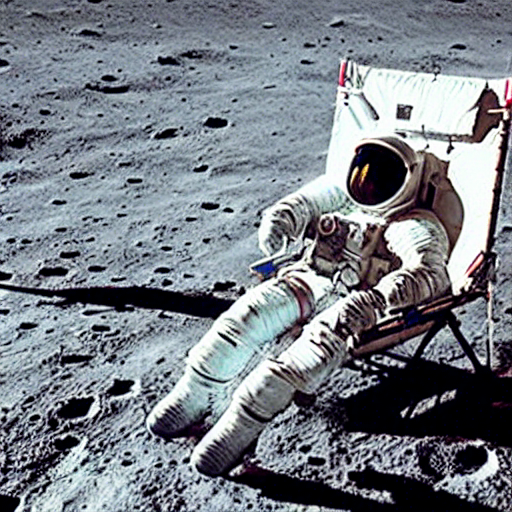
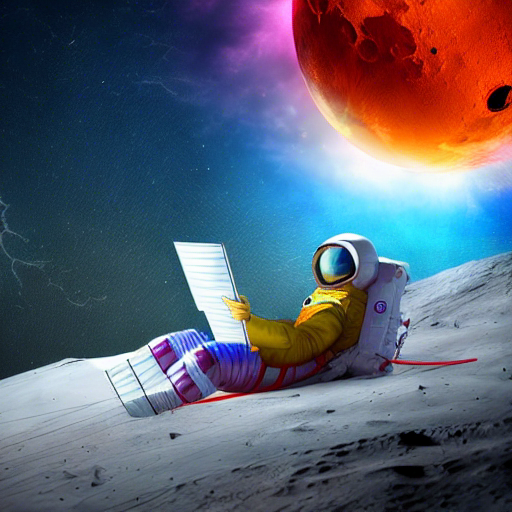
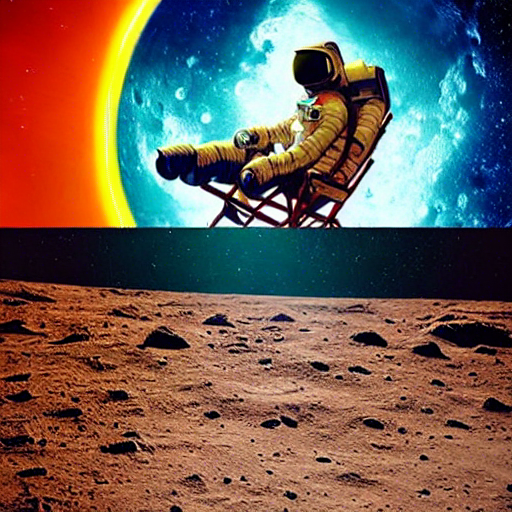
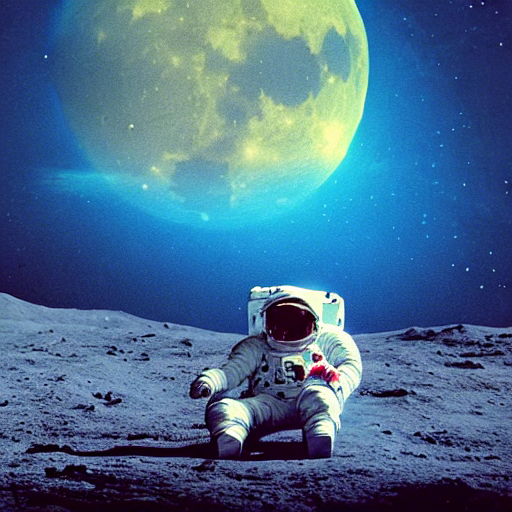
Let’s now generate a test image of an astronaut relaxing on a beach bed on the moon:
python scripts/txt2img.py --n_samples 1 --n_iter 5 --prompt "an astronaut relaxing on the moon in a beach chair"
After completion your images will be in outputs/txt2image-samples/samples as numbered PNG-files. The outputs/txt2image-samples directory will contain grid images which combine generated images into a single overview. These can get pretty large (and therefore not so useful) when generating large amounts in a single batch, so you may want to disable this using the --skip_grid flag.
 }}
}}
 }}
}}
 }}
}}
 }}
}}
Before I continue I’ll explain some details about the prompts:
--n_samples 1limits the number of samples to generate, which will help in situations with lower GPU VRAM. Setting this to 1 is fine, because for generating multiple samples the –n_iter flag is used--n_iter 5performs 5 iterations to generate the same amount of examples. Usually 5 examples will provide at least one good image--plmsimproves the image quality at the expense of some additional computation time--skip_gridis useful when generating large amounts in a single batch to prevent a very large grid to be generated
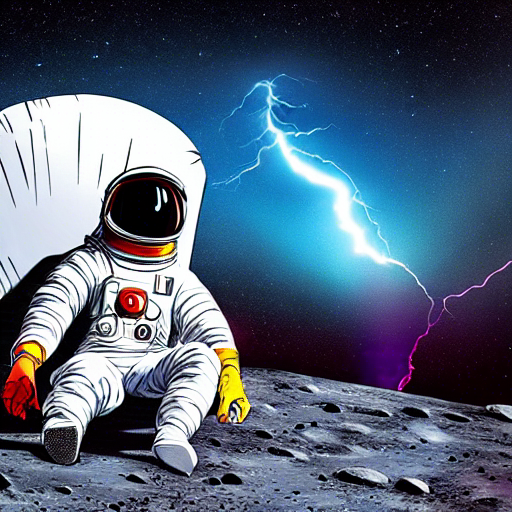
If you are following along you may have noticed the examples look a bit bland and mainly styled as an black and white photograph at the time of the 1969 moon landing. A great feature of Stable Diffusion (and any other image generation algorithm for that matter) is the option of giving stylizing hints in the prompt to influence the results. Let’s try to make the picture a bit more striking:
python scripts/txt2img.py --n_samples 1 --n_iter 5 --prompt "an astronaut relaxing on the moon in a beach chair, vibrant lightning, highly detailed, cinematic, very colorful, saturated colors"
 }}
}}
 }}
}}
 }}
}}
 }}
}}
This will hopefully give you an idea. For more examples of prompt engineering to influence the outcomes of the algorithm check out https://lexica.art
Part 2 – Using a web-based GUI
To make your experimentation workflow a bit more straightforward and to make it easier to review and change your prompts I recommend to start working with the web-based GUI from the following project: https://github.com/sd-webui/stable-diffusion-webui
Installation for this is quite straightforward by using the installation instructions here: https://sd-webui.github.io/stable-diffusion-webui/docs/2.linux-installation.html. You just need to download the installation script which will prompt you for a few questions which may not be immediately clear. Note that the optimized version you are prompted for is meant for GPUs with 4 GB of VRAM, so if you are running one with more VRAM you shouldn’t need this.
After installation the interface looks as follows:
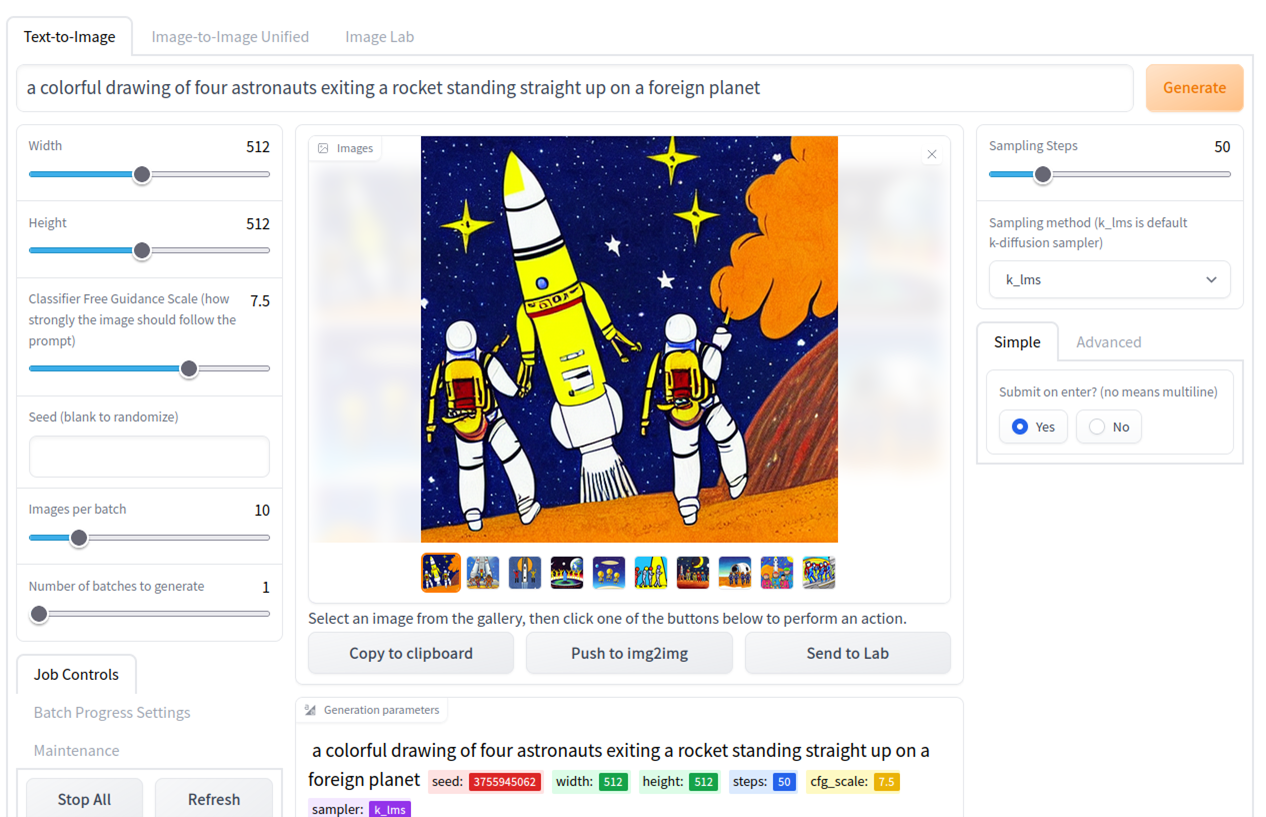
It should all be pretty self-explanatory. You can play around with number of batches and batch size to generate multiple images in one go and view the results.
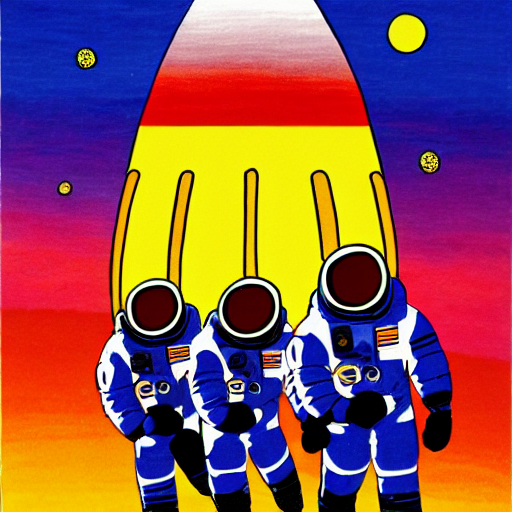
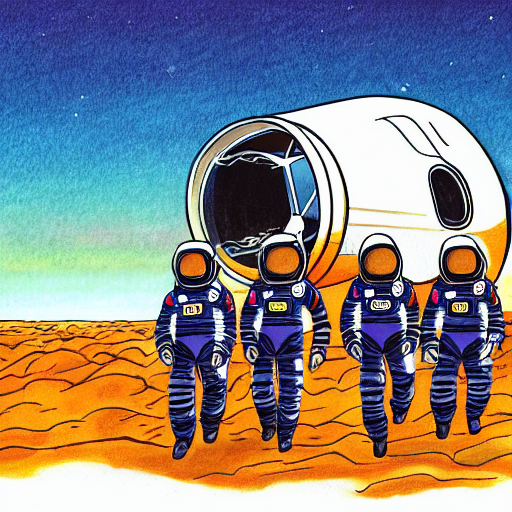
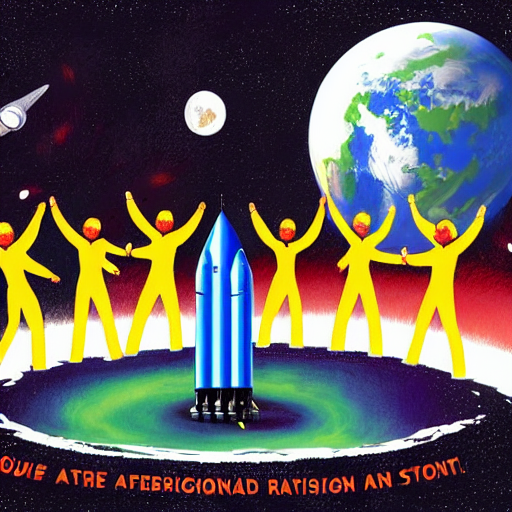
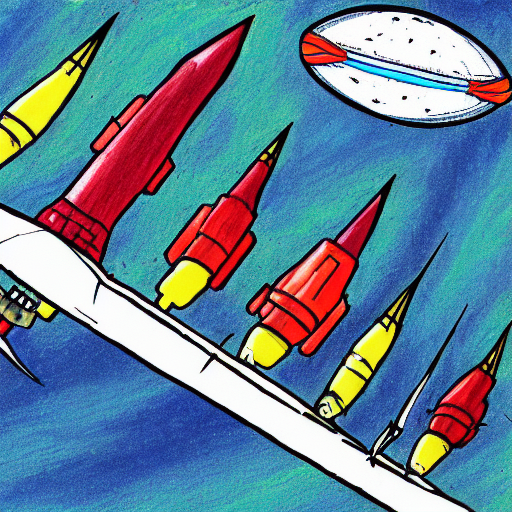
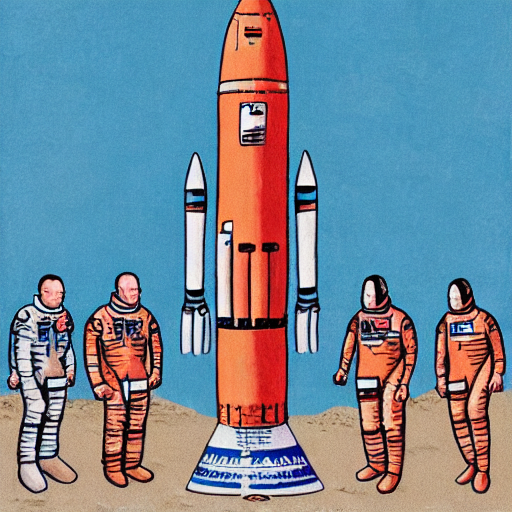
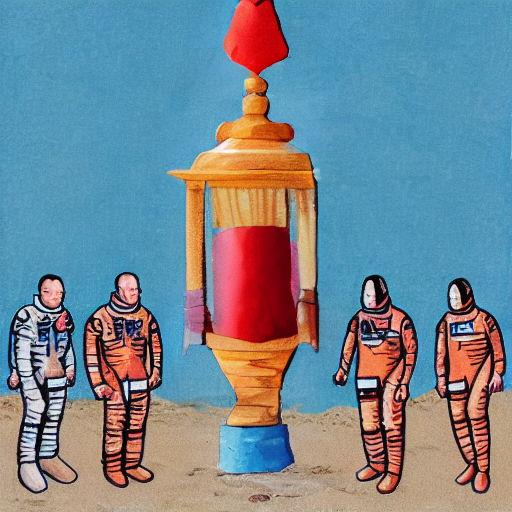
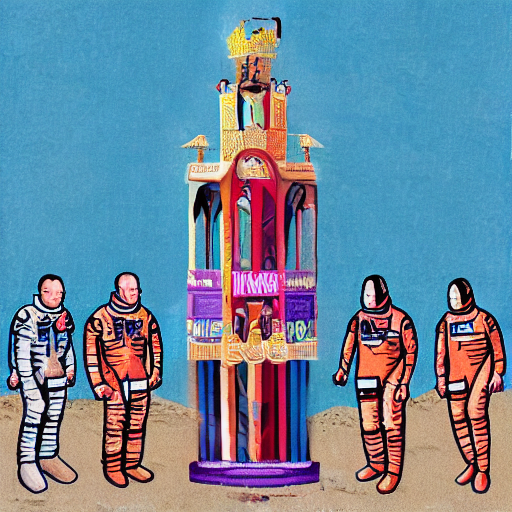
I used the GUI to generate a few images with the following prompt: “a colorful drawing of four astronauts exiting a rocket standing straight up on a foreign planet”.
 }}
}}
 }}
}}
 }}
}}
 }}
}}
There are some interesting observations to be taken from these images:
- You will notice that the algorithms has difficulties counting the number of astronauts. There will be many occurrences of images containing 2, 3 or even 6 astronauts
- Sometimes the algorithm has problems relating number 4 to the astronauts count and generates an image with 4 rockets instead
- One of the example images contains a text string. As is the case with other image generation algorithms like DALL-E 2 these algorithms are notoriously bad in generating comprehensible language. One explanation for this I have seen is that this may be related to the internal text representation the network uses
Image inpainting
Another interesting feature of the web UI is the AI-based inpainting algorithm. This allows you to mask certain parts of an image and have the AI re-generate the part of the image you masked.
I took the below example and used “Transfer to Img2Img” to mask the rocket from the image.
 }}
}}
Now regenerate the image to retrieve some pretty weird-looking results:
 }}
}}
 }}
}}
 }}
}}
Other features of the web-based GUI are located on the “image lab” tab where you have the option of applying AI-based sharpening algorithms on material generated by Stable Diffusion or on pictures you upload yourself.
Wrap-up
The developments in the AI-based text-to-image field are nothing short than a revolution and are still moving at an incredibly fast pace. This blog post hopefully shows that is not all that complicated to get started with Stable Difussion yourself provided you have the hardware (10 GB VRAM and above). The web-based GUI even allows for an optimized mode for users with 4 GB of VRAM at the expense of runtime where part of the algorithm is run on CPU.
Prompt engineering is an important way of influencing the results, and just like DALL-E 2 the more detail you put in the prompt, the more detailed and lively the results will be.
Stay tuned for some other novel and creative usages of Stable Diffusion I will be writing about soon!
Dirk Kemper
Deep learning Stable Diffusion