A no-code introduction to Reinforcement Learning
In my previous blog post on reinforcement learning I demonstrated a way to get a gentle introduction into this field by using Keras-RL2. While writing that I found it quite difficult to get an overview of the many reinforcement learning frameworks available today which all have different levels of maturity.
While investigating those frameworks I came across a new 3.0 release of the stable-baselines reinforcement learning framework at https://github.com/DLR-RM/stable-baselines3 which is aimed at providing a great developer experience in terms of documentation and API stability (hence the name).
In this post I will dive into how to set up a reinforcement learning experiment using stable-baselines 3 which provides you an even quicker way to get started.
Let’s set up a Python environment first. I will be using Python 3.7.11 for this example. Simply download stable-baselines3 first:
pip install stable-baselines3
Now in order to get quick results without any programming required you should check out the stable baselines zoo at https://github.com/DLR-RM/rl-baselines3-zoo. This provides a bunch of either pre-trained environments or parameter sets which can immediately be applied to the major OpenAI Gym environments and also the Atari emulator. These parameters are stored in scripts which are grouped by their reinforcement learning algorithm in the hyperparams-folder.
Let’s recreate the SpaceInvaders example from the previous post. Recall I have been using the DQN algorithm for training this. The hyperparameters-folder contains a dqn.yml file which lists the Atari parameters right at the top:
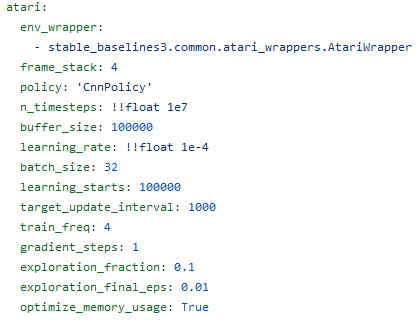
Let’s use these defaults and start training straight away using these settings.
Retrieve the stable-baselines zoo from github:
git clone https://github.com/DLR-RM/rl-baselines3-zoo
Install the necessary requirements:
pip install -r requirements.txt
Now cd into rl-baselines3 and clone the pre-trained agents as well. This is a 1.2 GB download at the time of writing this:
cd rl-baselines3
git clone https://github.com/DLR-RM/rl-trained-agents
You now have access to both the scripts for quickly getting started with training your own reinforcement learning agents as well as a set of pre-trained agents.
The experiment workflow
Getting results in reinforcement learning can be quite challenging, even more so when compared to other already complex fields as image recognition. As always there will be many parameters and optimizations involved which may only become apparent after hours or days of training. To ease this process and get more insights into how the training is progressing a reinforcement learning framework should in my view be assisting with at least the following functionality:
- Start, stop and resume a training job at any point in time
- When resuming training, resume from an earlier loaded model checkpoint or from an already trained model
- Allow for storing multiple model checkpoints along the training process
- Run simulations using one of the checkpoints stored during training to see the agent’s progress trained so far
- Allow to view the results of the reward function and neural network loss functions during training
- Record a video of the agent running on a trained model
Now this will probably all sound fairly straightforward but I was not able to find that many frameworks that tick all these boxes. I will go over these topics in the next section.
Starting, stopping and restarting training jobs
To kick off training for the SpaceInvaders using the DQN algorithm use the following command:
python train.py --algo dqn --env SpaceInvadersNoFrameskip-v4 --eval-freq 10000 --save-freq 50000
This will evaluate performance after 10.000 training rounds and will save a new model checkpoints after every 50.000 rounds. The environment is SpaceInvadersNoFrameskip-v4 which at this point is the latest version of the environment, appending NoFrameskip makes sure the environment outputs the full 60 FPS of the emulator and is not skipping random frames. In my experience this gives better performance than the default environment with frame skipping.
Training can be aborted at any point with CTRL-C. The output of the training is stored in the logs-folder, followed by a folder named by the algorithm (in this case dqn) and then the experiment name. In this case this should be logs/dqn/SpaceInvadersNoFrameskip-v4_1
Where the last number is the experiment id, in this case number 1.
Resuming training from a model checkpoint or fully trained model
To resume training from an aborted run you need the location of the last checkpoint which is stored in logs/dqn/SpaceInvadersNoFrameskip-v4_<EXP_NUM>.
Each experiment is stored in its own folder containing the environment name and an experiment id, like SpaceInvadersNoFrameskip-v4_2 which is the 2nd experiment for this environment. This folder will contain a final model called best_model.zip and also some model checkpoints defined by the checkpointing interval and the training runtime. Please have a look at this folder structure and its files because you will need to refer to these later on quite often.
If you aborted training midway you can resume training from the checkpoint created after 50000 training steps as follows. The number of checkpoints created along the way depends on the parameters you gave.
python train.py --algo dqn --env SpaceInvadersNoFrameskip-v4 -i logs/dqn/SpaceInvadersNoFrameskip-v4_<EXP_NUM>/rl_model_50000_steps.zip
I found it pretty common wanting to further train on an already finished run, usually because I wanted to see the effect of putting in more rounds of training. This can be accomplished as follows:
python train.py --algo dqn --env SpaceInvadersNoFrameskip-v4 -i logs/dqn/SpaceInvadersNoFrameskip-v4_<EXP_NUM>/best_model.zip -n 10000000
The -n argument allows you to increase the training rounds.
Note: resuming an experiment in both scenarios will lead to the creation of a new experiment number. For instance, of you last experiment number was 3, resuming it using one of the above statements will lead to the creation of experiment 4.
Allowing storage of multiple model checkpoints
Checkpointing the progress during training is a very important feature. As is the case with any machine learning algorithm, neural networks are also prone to overfitting. You’d like to prevent ending up with an overfitted model after a day’s worth of training with no way of tracking back. This is why you want to store model checkpoints after a certain number of steps. My rule of thumb is using the number of steps which can be trained in about 30 minutes. This allows for resuming training without losing too much progress and also allows for comparing various checkpoints after training concludes.
To allow for model checkpointing every 500.000 steps you need to use the –save-freq parameter:
python train.py --algo dqn --env SpaceInvadersNoFrameskip-v4 -i logs/dqn/SpaceInvadersNoFrameskip-v4_<EXP_NUM>/best_model.zip -n 10000000 --save-freq 500000
Simulating the agent using a checkpoint
You can run a simulation of the agent using the enjoy.py program from stable-baselines3-zoo. If you have a fully trained model with a specific experiment number you want to simulate this can be done as follows:
python enjoy.py --algo dqn --env SpaceInvadersNoFrameskip-v4 -f logs/ --exp-id <EXP_ID> --load-best
Similarly loading a model checkpoint can be done as follows:
python enjoy.py --algo ppo --env CarRacing-v0 --exp-id <EXP_ID> -f logs --load-checkpoint 9000000 -n 500000
This loads the checkpoint saved at step 9.000.000 and simulates it for 500.000 timesteps.
Checking intermediate training progress
To allow for checking the training progress during training the optimal tool is TensorBoard, which displays various metrics resulting from the training process. To allow for TensorBoard inspection during training you need to use the --tensorboard-log flag as follows:
python train.py --algo dqn --env SpaceInvadersNoFrameskip-v4 --eval-freq 10000 --save-freq 50000 --tensorboard-log ~/tensorboard/stable-baselines
Make sure you have created directory ~/tensorboard/stable-baselines first.
Now you can start Tensorboard with the log directory as input:
tensorboard --logdir ~/tensorboard/stable-baselines
This will start Tensorboard listening on localhost, by default at http://localhost:6006
It will go too far for this blog to dive into all details from TensorBoard itself, so I will focus on a few metrics that stable-baselines3 provides to you for checking training progress.
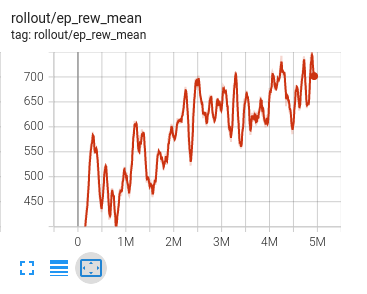
Below you can find a graph of the development of the mean episode reward during training. The training timesteps range from 0 to 5M and you can see that the reward as a whole is nicely increasing during training:
Another interesting metric is the mean episode length which indicates how long an episode has been played by the agent. The definition of an episode will vary over the various games, in case of Breakout for instance an episode concludes after depleting all three lives. In other environments only a single live is given and losing that finshes the episode.
Recording a video of the end result
To record a video of a trained agent you need to use the utils.record_video script as follows:
python -m utils.record_video --algo dqn -f logs --env SpaceInvadersNoFrameskip-v4 --exp-id 7 -n 50000
This will create a video of 50.000 timesteps of experiment 7. You can find the video in the folder of the corresponding experiment in the video subdirectory as an .mp4-file.
Note that creating the video does a live rendering of the agent’s interactions with the environment so rendering a 10-minute video also takes 10 minutes to render.
An alternative to recording a video is directly checking the agent’s output using the enjoy.py script as follows:
python enjoy.py --algo ppo –dqn SpaceInvadersNoFrameskip-v4 -f rl-trained-agents -n 5000
This runs the simulation for 5000 timesteps. However at this point of writing the rendering of the simulation was just as fast as your CPU would perform, which is too fast for the Atari environments. This seems to be a bug in the way that OpenAI Gym is called so for properly viewing the results I recommend to use the video rendering instead.
Conclusion
I have shown you a way to quickly start experimenting with reinforcement learning using the stable-baselines3 framework and the pre-trained agents without the need of writing code yourself. The framework supports all necessary steps in a workflow like starting and restarting training, inspecting progress and recording videos of the end results. At this moment I believe this is the easiest way to start training your own agents using reinforcement learning.
Dirk Kemper
stable-baselines3